

https://www.virtualbox.org/wiki/Downloads. It is also recommended that you download
and install the corresponding extension pack, as it provides USB 2.0 and 3.0 support, RDP,
disk encryption, and several interesting features.
From the Kali downloads page, choose your preferred version. As mentioned earlier, we
will use the Xfce4 64-bits ISO (https://www.kali.org/downloads/). You can choose any
other version according to your hardware or preference, as the installed tools or the access
to them will not be different for different versions—unless you pick a Light version that
only includes the operating system and a small set of tools.
Creating the virtual machine
Start by opening VirtualBox and creating a new virtual machine. Select a name for it (we

will use Kali-Linux), and set Linux as the type and Debian (64-bit) as the version. If you
selected a 32-bit ISO, change the version for Debian (32-bit). Then, click on Next:

In the next screen that appears, select the amount of memory reserved for the virtual
machine. Kali Linux can run with as low as 1 GB of RAM; however, the recommended
setting for a virtual machine is 2-4 GB. We will set 2 GB for our machine. Remember that
you will require memory in your host computer to run other programs and maybe other
virtual machines:

In the next step, we will create a hard disk for our virtual machine. Select Create a virtual
hard disk now and click on Create. On the next screen, let the type remain as VDI
(VirtualBox Disk Image) and Dynamically allocated. Then, select the filename and path;
you can leave that as it is. Last, select the disk size. We will use 40 GB. A freshly installed
Kali Linux uses 25 GB. Select the disk size, and click on Create:

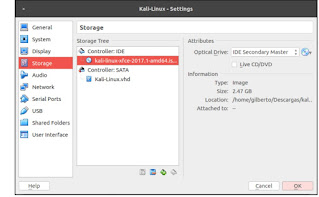
Now that the virtual machine is created, select it in the VirtualBox list and click on SettingsInstalling the system
in the top bar. Then, go to Storage and select the empty drive that has the CD icon. Next, we
will configure the virtual machine to use the Kali Linux ISO that you just downloaded as a
bootable drive (or live CD). Click on the CD icon on the right-hand side, then on Choose
Virtual Optical Disk File... , and navigate to the folder where the Kali ISO was
downloaded:

Accept the settings changes. Now that all of the settings are complete, start the virtual
machine and you will be able to see Kali's GRUB loader. Select Graphical install and press
Enter:

Now you've reached the point wh
ere you need to select where to install the system and the

In the next few screens, you will have to select language, location, and keymap (keyboard
distribution):

Following this, the installer will attempt the network configuration. There should be no
issue here, as VirtualBox sets a NAT network adapter for all new virtual machines by
default. Then, you will be asked for a hostname and domain. If your network requires no
specific value, leave these values unchanged and click on Continue.
Next, you will be asked for a password for the root user. This is the user with highest
privileges in your system, so even if the virtual machine is to be used for practice and
testing purposes, choose a strong password. Select your time zone and click on Continue.

ere you need to select where to install the system and the
hard disk partitioning. If you have no specific preferences, choose the first option, Guided
partitioning. Select the option for using the entire disk and click on Continue. In the next
screen, or when you finish configuring the disk partitioning, select Finish partitioning and
write the changes to disk, and click on Continue:
 Click Continue in the next screen to write the changes to the disk and the installation will
start.
When the installation finishes, the installer will try to configure the update mechanisms.
Verify that your host computer is connected to the internet, leave the proxy configuration
unchanged, and select Yes when asked if you want to use a network mirror:

The installer will generate configuration files for APT, the Debian package manager. The
next step is to configure the GRUB boot loader. Select Yes when asked, and install it in
/dev/sda:

virtual machine. At this point, you can remove the ISO file from the storage configuration as
you won't need it again.
Once the virtual machine restarts, you will be asked for a username and password. Use the
root user and the password set during the installation:


.png)
.jpeg)

.png)
.jpeg)
